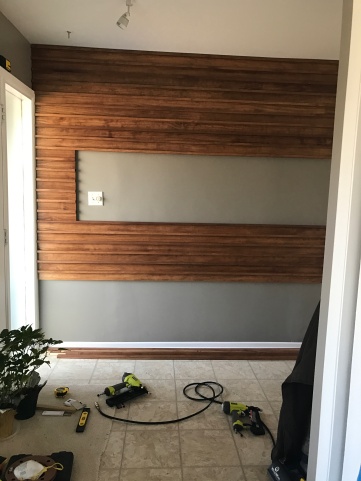
I wasn’t looking forward to the process of multiple staining and sanding of the wood slats, but was surprised when the Minwax instructions said to NOT sand between applications. I was a bit skeptical, but followed the directions and was happy with the results. I applied about 2-3 coats of stain with rags (old socks!) waiting for each coat to dry before applying the next. I liked the slight sheen that came from only using the stain, and opted to not apply any Polyurethane clear coat. Here is the mockup:

I did not pre-cut any of the slats due to the slight variations in the wall length which ranged from 1/4″ to 1/2″. I first held a slat on the wall, and marked the overhang (part to cut off) and trimmed off using a miter saw. I used a brad nailer to attach the 1″ x 2″ to the top of the 1″ x 3:

This also helped to straighten out some of the boards that were slightly warped. Using a finish nailer, I attached the first board to sit on top of the window frame. I did this for a couple of reasons. 1) I did not want to notch the board around the window frame, and 2) the measurements worked out so that I would end up with a 1/4″ gap between the top board and the ceiling. The substrates are never perfectly straight and the gap will help conceal any differentiations.

The opening in the middle was to leave space for artwork and also so I wouldn’t need to re-surface or cut around the light switch.
And the finished product:

The artwork is made up of Chinese zodiac characters. The first two represent my wife and me and the grouping of three is for our kids.


I love this so much that my husband and I are attempting it this weekend on 2 adjacent walls in a small powder room! Questions – How did you attach each “L” section to the wall? Meaning, once you nailed the 1×2 to the 1×3, did you just nail once in the middle of the 1×3 along each stud or did you use 2 nails per stud? Because we are doing this in a space where close inspection is inevitable due to the size of the room, I want the nailheads to be uniform all the way across each board and also down the wall, but as few as necessary to support the weight of each. I would love it if we could figure out a way to hide the nails but that does not seem possible. Also, I noticed you tacked them directly into the Sheetrock, presumably along the studs… what size nails did you use? Thanks for any advice you can pass along!
LikeLike
Hi Wendy! Yes, I tacked the slats directly to the face of the drywall @ (2) nails per stud. I believe I used 16 gauge 2” finish nails. Since the nails were going to be visible, I made it a point to nail in the same location on each board so there would be a consistent pattern. For an 8’ slat, I attached at four points per board – one point each end and then 24” in from each end, leaving a “clean” surface in the middle.
Hope this helps! I’m excited for you and hope it turns out well!!
LikeLike
Thank you!! We are almost finished with the powder room and I am loving it! Thank you for posting this project and also for responding so quickly. Once this is project is complete, I might try some of your other projects too. Love the bird houses and mailbox!
LikeLike
I’d love to see pics of the finished installation if you are able to post (Instagram?)!
LikeLike
Hello – Beautiful and neat wall design! I plan on doing this in one of my bedrooms as an accent wall. The open part of the wall was that 2 feet or more?
Thank you and again love this design.
Amy
LikeLike
Hi Amy,
Thanks! The opening is about 2 feet – based on the wood plank size. Hope that helps. Good luck!
LikeLike